Many businesses, schools, and other organizations have adopted cloud storage services like Box, Dropbox, Google Drive, and Microsoft OneDrive for excellent reasons. Cloud storage provides a centralized spot for shared data without the up-front cost or maintenance issues of a network-attached storage device. It also allows individuals to access the same files on multiple devices and significantly enhances collaboration by allowing multiple people to work on the same file.
All cloud storage services provide a simple Web-based interface that’s the least common denominator. The Web interfaces look and work the same for everyone, regardless of platform. Unfortunately, they’re clumsier—sometimes much more so— than working with the same files in the Mac’s Finder.

Luckily, cloud storage services also provide deep integration with the Finder. If you haven’t already installed your cloud storage service’s Mac app, we strongly encourage you to do so. Here are links for the big four; others will likely provide similar apps.
Once the software is installed, you’ll find an item in the Locations portion of your Finder window sidebar that provides access to everything in your cloud storage, as though it were on an external hard drive connected to your Mac. You can quickly rename files, add folders, move files between folders, and perform other basic Finder tasks. The services also install menu bar items you can click to access settings, activity, and other controls (Dropbox shown below).

Cloud storage is not the same as an external hard drive, of course, so you need to keep certain facts in mind when using cloud-based data in the Finder. Some of this information has changed within the last few months, as cloud storage providers have migrated from Apple-deprecated custom kernel extensions to Apple’s recommended File Provider extension. (The migration is still underway for Dropbox users.) Here are the most important things to know.
Data May or May Not Be Stored on Your Mac’s Drive
When integrating a cloud storage service into the Finder, it’s reasonable to ask where the data is actually stored. The short answer is that it’s always stored online, but it might also be stored on your Mac. All cloud-based files are either online-only, at which point all you see is a placeholder icon on your Mac, or offline, which means a copy of the files exists on your Mac. Online-only files and folders have a little cloud icon next to their names in the Finder; offline files lack that icon.

When you double-click an online-only file, the service’s Mac software downloads it in the background so it can open in the appropriate app. You shouldn’t notice a delay with small files, although it may become more noticeable with very large files or over slow Internet connections. And, of course, if you’re on an airplane or somewhere without connectivity, you can’t open online-only files at all. On the plus side, they don’t take up any space on your Mac’s drive until you open them.
You can control which files and folders are online-only and which are offline. Control-click the file or folder and look for commands like Download Now or Make Available Offline to bring its contents down to your Mac, or use commands like Remove Download or Make Online-Only to remove the download to save space.

All Your Files Live In ~/Library/CloudStorage
So where are the offline copies of cloud-based files stored on your Mac? It may seem like they’re on a drive of their own, but in reality, they’re stored in your home folder’s hidden Library folder, in a folder called CloudStorage. (To see the Library folder, open the Finder’s Go menu and press Option.) You never have to go there directly, but it can be useful to keep in mind when setting up backups, moving data between Macs, and more.
Only OneDrive Supports External Drives
There is an important caveat to the requirement that all cloud-based files live in ~/Library/CloudStorage. That folder lives on your Mac’s internal drive, which may not have sufficient space to store offline copies of all your cloud-based data. Before the switch to Apple’s File Provider extension, the cloud storage services let you store the offline copies of your files on an external hard drive. That’s no longer possible with Box, Dropbox, and Google Drive. Microsoft OneDrive has worked around this limitation, allowing you to specify an external drive as your cache to maintain a copy of offline data separately from the state of the items in the CloudStorage folder. (If you manage terabytes of offline files, particularly for audio or video editing work, check out the completely different LucidLink service.)
Dragging Files Moves Rather than Copies
When you work with an external hard drive or network drive, dragging a file from your Mac’s internal drive to one of those copies it because it’s going to a different volume. Although the cloud storage services seem to be separate volumes (some were in the past), they no longer act that way. That’s because all the data lives in the CloudStorage folder on your internal drive, so dragging a file out of Google Drive, say, moves it, just as though you dragged a file from one folder on your internal drive to another. It’s not a problem—and the services warn you about it—but keep it in mind.
Moved or Trashed Files Remain Available Online, at Least Temporarily
What happens to the online version of a file when you move it from the cloud storage service on your Mac to another location on your Mac’s internal drive? Good question, and the answer is that it ends up in the trash equivalent on the service’s website. Cloud storage services generally retain such files for some time—30 days is common—after which they go away for good.

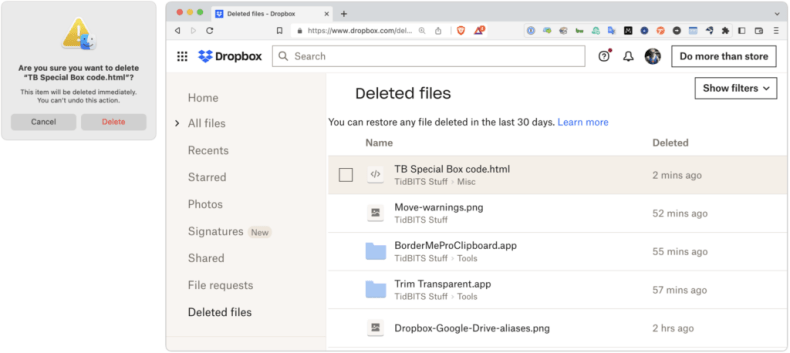
When you delete a cloud-based file in the Finder, the same thing happens: it ends up in the service’s online trash equivalent. However, what happens on your Mac varies by service, so testing with a sacrificial file is worthwhile. For example, if you delete an offline file in Dropbox, it moves to the Mac’s Trash. However, if you delete an online-only file, Dropbox warns you that it will be deleted immediately, and it disappears instantly from the Mac rather than moving to the Trash. You can still find it in Dropbox’s Deleted Files folder on the Dropbox website. In contrast, deleting either type of file from Google Drive moves it to the Mac’s Trash (and puts it in Google Drive’s online Trash folder).
Sharing Files and Paths with Colleagues
All the cloud storage services let you Control-click a file and copy a link. When a co-worker clicks that link, it will open in the cloud storage service’s Web interface or possibly in an online version of the app that created it. That may be fine, but our experience is that they won’t be able to find the file again in the future.
To help colleagues learn where files are in a shared cloud-based folder structure, send them the path to the file—the full list of folders containing the file. The trick for getting it is to select the file in the Finder, Option-click the Edit menu, and choose Copy “MyFile” as Pathname.
The start of the path is specific to your Mac, so delete that and leave the rest. For instance, when you paste the path, if you get this:
/Users/foobar/Library/CloudStorage/GoogleDrive-foobar@example.com/My Drive/GroupShared/Buzz/Posts/Buzz-0004.pdf
Trim it as follows to clarify that the file is in the Posts folder, which is in the Buzz folder, and that’s in a top-level folder called GroupShared:
/GroupShared/Buzz/Posts/Buzz-0004.pdf
Searches May Work Poorly for Online-Only Content
The split between online-only and offline files also affects how Spotlight and other content-based searches work. As you would imagine, if a file is online-only, there’s no way Spotlight can index its content, so Spotlight won’t be able to find such files based on content searches. Some of the cloud storage services offer content-based searches, so with Google Drive, for instance, if you initiate a search from its Web interface, it will find all files containing the search terms even when they’re set to online-only on your Mac.
Filename searches in Finder windows should work regardless of online-only/offline state, although we’ve experienced problems when trying to limit the scope within the service’s Mac folder—search the This Mac scope for the best results. (Click the This Mac button after starting the search if necessary.) You may also have good luck with third-party search utilities like EasyFind and Find Any File.

Backups Work Only for Offline Content
Finally, remember that Mac backup systems like Time Machine and Backblaze cannot back up online-only files because they don’t actually exist on your drive. At best, such backup apps will show the placeholder for the file but won’t back up its content. They work fine for offline files, of course, but if you have to find a particular file or folder when restoring, remember that backup apps other than Time Machine will probably see it as stored in ~/Library/CloudStorage.
Should you care if your cloud-based files are backed up locally? Cloud storage systems automatically protect data against drive failure or other problems in the cloud. Plus, any shared data that one of your collaborators deletes from their Mac—inadvertently or maliciously—should be maintained in that person’s online trash, even if it seems to disappear.
However, we’d argue that it’s all too easy to lose or corrupt cloud-based data such that you want a local backup. We’ve seen too many situations where cloud-based files went missing or had problems. In those cases, a local backup provided an essential fallback or welcome peace of mind.
To ensure that your cloud-based files are backed up alongside your other files, you must make sure they’re stored offline long enough to get into your backups. Select top-level folders, make them offline, and wait until everything has downloaded and been backed up. If you need the space back, you can return some folders to being online-only. Pay attention to new files added by other devices or people since they may be online-only by default and thus fail to be included in your backups.
For backup of an organizational cloud storage account, it might make more sense to use a service like Backupify, CloudAlly, or CubeBackup, or to rely on something like a Synology NAS device with Cloud Sync. But that’s a topic for another day or another discussion—get in touch to learn more.
(Featured image by iStock.com/Galeanu Mihai)


